

Secure Connections
PuTTY is a lightweight SSH client for Windows.
Use it if you need access to a text console on gauss
(or any other machine where you can login via SSH).
Download from www.chiark.greenend.org.uk/~sgtatham/putty,
or search the Web for PuTTY, in case the URL has changed.
WinSCP is a GUI program for secure connections. Its important feature is a built-in text editor,
capable of editing files on a remote Linux/UNIX system (without wreacking havoc with line endings). Files you
may want to edit are .procmailrc (mail filtering/forwarding), .vacation.msg (vacation autoreply message),
web site files in public_html etc. Download WinSCP from winscp.net.
Choose Explorer interface option while installing. Upon connection, navigate to folder/file of interest,
right-click on it, choose Edit, make necessary changes, Save (floppy disk icon).
Cygwin is a UNIX-like environment for Windows. It provides an impressive range of traditional open source GNU software: from cat, cp, tar and rsync to compilers, PERL, TeX/LaTeX and X Window graphical system. Cygwin comes with a GUI setup.exe utility, which lets you select what packages should be installed (or added later). SSH is provided in 'openssh' package. Cygwin home.
Filezilla is a GUI program for secure file transfers.
Download from filezilla-project.org, install
and lauch the program. Choose File → Site Manager → New Site. Configure SFTP connection to
gauss:
-
Host: math.dartmouth.edu
Servertype: SFTP - SSH File Transfer Protocol
Logontype: Ask for password
User: your username on gauss
Click OK to save configuration or Connect to save and connect at once.
VPN
Dartmouth VPN
Dartmouth currently uses GlobalProtect VPN. See VPN in ITC knowledge base.
Math VPN
Math VPN uses OpenVPN technology. Search for and install OpenVPN client app for your device (available for Android, Chrome OS, iOS, Linux, macOS, Windows). Download MathVPN.ovpn configuration file. Use your OpenVPN app to add a new VPN configuration by importing the downloaded MathVPN.ovpn. There is no need to provide a certificate in VPN configuration.
When starting MathVPN connection use your “gauss” login credentials.
If the app doesn't offer a way to import configuration files, here are MathVPN parameters for manual configuration:
VPN type: OpenVPN
Gateway or portal: 129.170.28.58
Authentication: use your “gauss” username and password
Math Email
If you have Math Dept. user account (also known as “gauss” account), you also have a corresponding email account.
Your Math email arrives at (and can be sent from) math.dartmouth.edu server. It can be accessed
instantly and globally via Webmail — this does not require any configuration! As for email applications, all of them, including mobile,
can be configured to use your Math account using these generic settings:
Incoming server: math.dartmouth.edu, type: IMAP, port: 993
Connection type/encryption: TLS
Username: your Math username
Password: for the username above
Outgoing/SMTP server: math.dartmouth.edu, port: 465, protocol: TLS; authenticate with Math username and password.
Please use plain text to write email whenever possible (useplaintext.email), thank You!
Darmouth Name Directory lookups in Thunderbird
Address Book > Add LDAP Address Book:
General tab:
Name: Dartmouth AD
Hostname: kiewit.dartmouth.edu
Port number: 636
Use secure connection (SSL): yes
Base DN: ou=people,dc=kiewit,dc=dartmouth,dc=edu
Bind DN: your_netid@kiewit.dartmouth.edu
Advanced tab:
Search filter: (objectclass=*)
Login method: Simple
Below are step-by-step instructions on how to add your mathusername@math.dartmouth.edu account to Thunderbird and Outlook. Please use plain text to write email whenever possible (useplaintext.email), thank You!
Thunderbird
-
Tools →
Account Settings… →
Account Actions →
Add Mail Account…
Your name: Your real name
Email address: mathusername@math.dartmouth.edu
Password: password for the above
Continue — Thunderbird will probe servers and should detect correct connection settings:
          Incoming: math.dartmouth.edu  IMAP  143  STARTTLS
          Outgoing: math.dartmouth.edu  SMTP  587  STARTTLS
If settings were detected correctly — click Create Account.
Otherwise click Manual Setup and enter correct settings under Server Settings and Outgoing Server (SMTP). -
Tools →
Account Settings…
Server Settings: Advanced: IMAP server directory: mail
Composition & Addressing: Uncheck “Compose messages in HTML format”.
Vacation Autoreply
- Start WinSCP. Connect to
gaussusing Math username and password. - Edit autoreply message text:
- Find
.vacation.msg(viewing hidden files must be enabled, Ctrl+Alt+h) - Right-click on it, choose Edit, make any changes, save, close editor window.
- Enable autoreply:
- Find
.mailfilter - Right-click on it, choose Edit, find these lines:
...
# Vacation autoreply:
# To set a vacation message uncomment (remove leading #) from the
# last line below.  To turn off vacation message, but the # back.
# The message which is sent is .vacation.msg
#`/usr/bin/vacation -r 3 yourgaussusername`
...
- Remove leading
#character from the last line, save, close editor window. - Send an email to yourself from another mail account as a test.
- To disable autoreply, edit
.mailfilterand comment out the line by putting back#character at the beginning.
Backing up Your Files
macOS and Windows backup system is provided by the ITC. Please see CrashPlan — Automatic Backup Solution (or search services.dartmouth.edu for current solution).Making X Connections to Linux Machines
We recommend using Cygwin/X. Cygwin installer can be downloaded from
cygwin.com. After installation is complete, run Cygwin Terminal
and then start X by giving a startxwin command (provided by Cygwin xinit package). Wait for the (green) “X Applications” icon to appear
on your Windows taskbar. The icon gives access to Cygwin/X apps and settings. If the application you are seeking is not listed,
you still might be able to run it by first starting XTerm and then running your app from there by typing its name.
To run an X application on a remote Linux machine, e.g. gauss, while in XTerm type:
ssh -Y username@gauss program_name
Use XLaunch for shortcuts to X applications, local and remote
“XLaunch is a wizard to make starting X server sessions easy.” It's part of Cygwin/X.
- Make a shortcut to start XTerm locally
Start XLaunch and choose the following settings: -
Multiple windows (Next)
Start program (Next)
Start program on this computer
Local program: xterm
(Next, Next)
Save configuration. - Make a shortcut to start XTerm (or any other program) on gauss
Start XLaunch and choose the following settings: -
Multiple windows (Next)
Start program (Next)
Start program on remote computer
Connect using: ssh
Remote program: xterm (or any other program on gauss)
Connect to computer: math.dartmouth.edu
Login as user: your_gauss_username
OFF - Use keychain
ON - Prompt for SSH password [1,2]
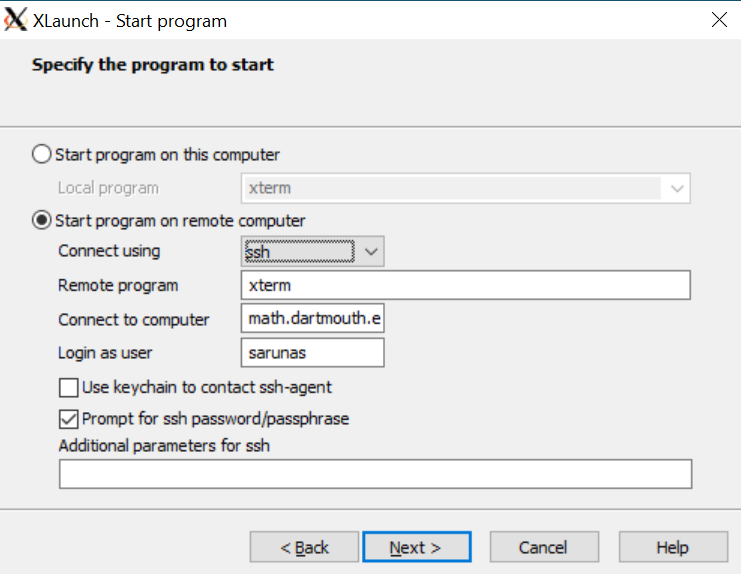
(Next, Next) Save configuration.
Configuration will be saved to an .xlauch file. Clicking on it will invoke X program according to settings. To change any of these settings use Right-click then Edit. Windows doesn't allow to change the icon associated with .xlaunch (not in the easy way). .xlaunch file can be put anywhere in a file system and then a shortcut can be created on Desktop. Shortcut's icon can be changed easily.
Configuration will be saved to an .xlauch file. Clicking on it will invoke X conenction according to settings. To change any of these settings use Right-click then Edit. Windows doesn't allow to change the icon associated with .xlaunch (not in the easy way). .xlaunch file can be put anywhere in a file system and then a shortcut can be created on Desktop. Shortcut's icon can be changed easily.
Footnote 1.
Authentication can also be done using public/secret SSH key pair. In such a case, uncheck “Prompt for SSH password” option.
Footnote 2.
~/.ssh directory is in C:\cygwin64\home\youruser. This is where SSH keys and any SSH configuration settings will be.
From the Cygwin terminal it's the usual /home/youruser/.ssh/. Keys can be generated with the usual ssh-keygen.
PostScript
If you really want to view PostScript files on Windows, then you will have to install Ghostscript and Ghostview. The main site is here.
Mathematics at Dartmouth
29 N. Main Street | 6188 Kemeny Hall | Hanover NH 03755-3551 | 603.646.2415 | deptaa@math.dartmouth.edu